okHttp解析

介绍

OkHttp 现在作为Android时下最流行的网络框架(Retrofit 也是以OkHttp为底层的).先将okhttp的学习整理如下,本文是以3.10版本进行分析.(因为3.9版本跟3.10版本差别不大,有些图片的引用还是3.9的)

感谢: json_it的博客 码迷

okhttp网络请求流程

以官网demo为例进行分析

Get请求
1
2
3
4
5
6
7
8
OkHttpClient client = new OkHttpClient();
String run(String url) throws IOException {
Request request = new Request.Builder()
.url(url)
.build();
Response response = client.newCall(request).execute();
return response.body().string();
}
Post请求
1
2
3
4
5
6
7
8
9
10
11
12
public static final MediaType JSON
= MediaType.parse("application/json; charset=utf-8");
OkHttpClient client = new OkHttpClient();
String post(String url, String json) throws IOException {
RequestBody body = RequestBody.create(JSON, json);
Request request = new Request.Builder()
.url(url)
.post(body)
.build();
Response response = client.newCall(request).execute();
return response.body().string();
}

调用流程图如下

类,方法具体分析

OkHttpClient

要完成一次请求,我们必须先有OkHttpClient实例,使用者的所有操作都是通过它来完成的.OkHttpClient用于协调各个子模块工作,各个子模块直接相互独立.OkHttpClient因为有众多子模块,所以使用建造者设计模式进行装配.获取OkHttpClient实例有两种方式

方式1:

1
OkHttpClient client=new OkHttpClient();

不是说使用的是建造者模式吗?为啥没有Builder?
因为OkHttpClient的构造函数默认使用了默认的builder()

1
2
3
4
5
6
7
8
9
10
11
12
13
14
15
16
17
18
19
20
21
22
23
24
25
26
27
28
29
30
31
32
33
34
35
36
37
38
39
40
public OkHttpClient() {
this(new Builder());
}

........

public Builder() {
//调度器
dispatcher = new Dispatcher();
//请求协议 http1.1 http2
protocols = DEFAULT_PROTOCOLS;
// 链接规范 普通请求 加密请求(TLS)
connectionSpecs = DEFAULT_CONNECTION_SPECS;
//应用程序的HTTP调用的数量、大小和持续时间
eventListenerFactory =EventListener.factory(EventListener.NONE);
//选择在连接到URL引用的网络资源时要使用的代理服务器(如果有的话)
proxySelector = ProxySelector.getDefault();
//cookie
cookieJar = CookieJar.NO_COOKIES;
//java 套接字工厂
socketFactory = SocketFactory.getDefault();
//用于HTTPS请求时与域名校验
hostnameVerifier = OkHostnameVerifier.INSTANCE;
//https证书校验
certificatePinner = CertificatePinner.DEFAULT;
proxyAuthenticator = Authenticator.NONE;
authenticator = Authenticator.NONE;
//连接池
connectionPool = new ConnectionPool();
dns = Dns.SYSTEM;
followSslRedirects = true;
followRedirects = true;
retryOnConnectionFailure = true;
connectTimeout = 10_000;
readTimeout = 10_000;
writeTimeout = 10_000;
pingInterval = 0;
}

........

方式2:

1
2
3
OkHttpClient.Builder bulider=new OKHttpClient.Builder(); 
//根据builder进行自定义
OkHttpClient client=buider.xxx().xxx().build();

注: 因为OkHttpClient内部有连接池,线程池等,所以一般来说一个应用就一个OkHttpClient实例.

Request

Request类比较简单 只包含了 url, method, headers, body等一次请求的基本信息

RealCall

RealCall 目前是Call的唯一实现类,表示一个请求/响应对(流),用于操作管理请求.如:发送同步/异步请求,取消请求等.每一个call只能执行一次.其中重要方法如下

同步请求:

异步请求:


getResponseWithInterceptorChain:

从以上可以看到,RealCall 通过 execute / enqueue发送同步/异步请求,
getResponseWithInterceptorChain获取Response.其中异步请求会用Dispatcher来进行分配,虽然同步请求中也使用了Dispatcher但只是记录,稍后会在Dispatcher中详细分析.在getResponseWithInterceptorChain中,将开发者自定义的interceptor可必须的interceptor为每一个call进行添加,然后通过RealInterceptorChain进行逐个调用,具体会在下面分析.

Dispatcher

Dispatcher保存了一个OkHttpClient里的所有Call,包含同步Call(一个deque保存)和异步Call(两个Deque保存).其中异步Call默认最大支持64请求,单个Host默认最大5个请求.每个dispatcher使用一个{@link ExecutorService}来在内部运行调用。默认使用ExecutorService实现类ThreadPoolExecutor.如图:

同步请求:

在上面RealCall同步请求分析中,需要Dispatch做什么呢?

RealCall

1
2
3
4
5
6
7
8
@Override public Response execute() throws IOException {
......
try {
client.dispatcher().executed(this);
......
} finally {
client.dispatcher().finished(this);
}

Dispatcher

1
2
3
4
5
6
7
8
9
10
11
12
13
14
15
16
17
18
19
20
21
.......
synchronized void executed(RealCall call) {
runningSyncCalls.add(call);
}
.......

void finished(RealCall call) {
finished(runningSyncCalls, call, false);
}

private <T> void finished(Deque<T> calls, T call, boolean promoteCalls) {
int runningCallsCount;
Runnable idleCallback;
synchronized (this) {
if (!calls.remove(call)) throw new AssertionError("Call wasn't in-flight!");
if (promoteCalls) promoteCalls();
runningCallsCount = runningCallsCount();
idleCallback = this.idleCallback;
}
......
}

可以看到在同步请求中,Dispatcher只是将任务存入了runningSyncCalls集合中.在通过getResponseWithInterceptorChain获取到Response,最终会执行finally语句,将任务移除runningSyncCalls集合.

异步请求:

在RealCall执行异步请求时,最关键的代码是:

1
2
3
4
@Override public void enqueue(Callback responseCallback) {
......
client.dispatcher().enqueue(new AsyncCall(responseCallback));
}

Dispatcher中enqueue方法

1
2
3
4
5
6
7
8
synchronized void enqueue(AsyncCall call) {
if (runningAsyncCalls.size() < maxRequests && runningCallsForHost(call) < maxRequestsPerHost) {
runningAsyncCalls.add(call);
executorService().execute(call);
} else {
readyAsyncCalls.add(call);
}
}

可以看到如果正在执行的异步请求数小于最大请求数并且单个host异步请求数小于 maxRequestsPerHost(5)时,将AsyncCall直接放入正在执行的异步集合中,并立即执行,否则就将该请求放入readyAsyncCalls集合中.AsyncCall是Runnable的子类(间接),因此,在线程池中最终会调用AsyncCall的execute()方法执行异步请求.

1
2
3
4
5
6
7
8
9
@Override protected void execute() {
......
try {
Response response = getResponseWithInterceptorChain();
} catch (IOException e) {
......
} finally {
client.dispatcher().finished(this);
}

异步请求,最终也是通过getResponseWithInterceptorChain来获取响应的Response. 区别在于client.dispatcher().finished(this);因为这是另一个异步任务,所以调用的是另外一个finish方法:

1
2
3
4
5
6
7
8
9
10
11
 void finished(AsyncCall call) {
finished(runningAsyncCalls, call, true);
}

private <T> void finished(Deque<T> calls, T call, boolean promoteCalls) {
......
synchronized (this) {
if (!calls.remove(call)) throw new AssertionError("Call wasn't in-flight!");
if (promoteCalls) promoteCalls();
......
}

因为promoteCalls为true,所以要执行promoteCalls(); 方法:

1
2
3
4
5
6
7
8
9
10
11
12
13
14
15
private void promoteCalls() {
if (runningAsyncCalls.size() >= maxRequests) return; // 已经运行超过最大请求数,则return
if (readyAsyncCalls.isEmpty()) return; //缓存等待的请求为空,则return

for (Iterator<AsyncCall> i = readyAsyncCalls.iterator(); i.hasNext(); ) {
AsyncCall call = i.next();

if (runningCallsForHost(call) < maxRequestsPerHost) {
i.remove();
runningAsyncCalls.add(call);
executorService().execute(call);
}
if (runningAsyncCalls.size() >= maxRequests) return; // Reached max capacity.
}
}

可以看到如果有等待的异步请求,则会在符合最大请求数以及最大单个host请求数的前提下,继续执行.直到所有请求都执行完毕.

RealInterceptorChain

在介绍各个拦截器之前,需要先分析RealInterceptorChain,直译就是拦截器链.为什么要先分析这个类呢?因为各个Interceptor就是通过RealInterceptorChain这个类按照顺序调用的!,先看这个类是在哪里调用的,在上面分析RealCall中获取Response的getResponseWithInterceptorChain方法中:

可以看到我们添加的所有interceptors都传给了RealInterceptorChain类中,并通过RealInterceptorChain的proceed方法获取Response.我们在来看proceed方法:

1
2
3
4
5
6
7
8
9
10
11
12
13
14
15
16
@Override public Response proceed(Request request) throws IOException {
return proceed(request, streamAllocation, httpCodec, connection);
}

public Response proceed(Request request, StreamAllocation streamAllocation, HttpCodec httpCodec,
RealConnection connection) throws IOException {
......
// Call the next interceptor in the chain.
RealInterceptorChain next = new RealInterceptorChain(interceptors, streamAllocation, httpCodec,
connection, index + 1, request, call, eventListener, connectTimeout, readTimeout,
writeTimeout);
Interceptor interceptor = interceptors.get(index);
Response response = interceptor.intercept(next);
......
return response;
}

这个方法最重要的就是又重新创建了一个RealInterceptorChain(此时index+1),并且通过interceptors.get(index);获取拦截器后执行拦截器intercept方法.在后续分析中可以看到intercept(Chain chain)方法会继续调用责任链的proceed()方法.这样依次调用,当前拦截器的Response依赖于下一个拦截器的Intercept的Response。当执行到最后一个拦截器获取到Response后沿着调用相反的方向依次将Response返回,有点类似递归.

RetryAndFollowUpInterceptor

根据类名我就可以知道此拦截器用于失败重试,并根据需要进行重定向,并且如果调用被取消它可能会抛出IOException(“Canceled”)。
具体方法如下:

1
2
3
4
5
6
7
8
9
10
11
12
13
14
15
16
17
18
19
20
21
22
23
24
25
26
27
28
29
30
31
32
33
34
35
36
37
38
39
40
41
42
43
44
45
46
47
48
49
50
51
52
53
54
55
56
57
58
59
60
61
62
63
64
65
66
67
68
69
70
71
72
73
74
75
76
77
78
79
80
81
82
83
84
85
86
87
88
89
90
91
92
93
94
95
96
97
98
99
100
101
102
103
104
@Override public Response intercept(Chain chain) throws IOException {
Request request = chain.request(); //获取请求信息
RealInterceptorChain realChain = (RealInterceptorChain) chain;
Call call = realChain.call(); //获取RealCall
EventListener eventListener = realChain.eventListener(); //监听器

//用于协调链接,流,请求三者之间的关系后边会详细分析
StreamAllocation streamAllocation = new StreamAllocation(client.connectionPool(),
createAddress(request.url()), call, eventListener, callStackTrace);
this.streamAllocation = streamAllocation;

int followUpCount = 0; //
Response priorResponse = null;
while (true) {
if (canceled) { //如果请求取消则抛出取消异常
streamAllocation.release();
throw new IOException("Canceled");
}

Response response;
boolean releaseConnection = true;
try {
//调用下一个拦截器
response = realChain.proceed(request, streamAllocation, null, null);
releaseConnection = false;
} catch (RouteException e) {
// 试图通过路由连接失败。请求将不会被发送。
if (!recover(e.getLastConnectException(), streamAllocation, false, request)) {
throw e.getLastConnectException();
}
releaseConnection = false;
continue; //重试
} catch (IOException e) {
// 试图与服务器通信失败。请求可能已经发出。
boolean requestSendStarted = !(e instanceof ConnectionShutdownException);
if (!recover(e, streamAllocation, requestSendStarted, request)) throw e;
releaseConnection = false;
continue; //继续重试
} finally {
// We're throwing an unchecked exception. Release any resources.
if (releaseConnection) {
streamAllocation.streamFailed(null);
streamAllocation.release();
}
}

// 如果前一个生成的Response 不为空,则将前一次的response添加到本次的response中
if (priorResponse != null) {
response = response.newBuilder()
.priorResponse(priorResponse.newBuilder()
.body(null)
.build())
.build();
}

Request followUp;
try {
//followUpRequest会根据返回的response的code来决定是否进行重试,例如:返回code为200,或者请求超时等则返回null
//否则会根据code进行调整请求进行重试
followUp = followUpRequest(response, streamAllocation.route());
} catch (IOException e) {
streamAllocation.release();
throw e;
}

//followUp为null,返回当前的Response,如果不是长连接则释放资源
if (followUp == null) {
if (!forWebSocket) {
streamAllocation.release();
}
return response;
}

//释放ResponseBody所关联的资源
closeQuietly(response.body());

//超过最大重试次数
if (++followUpCount > MAX_FOLLOW_UPS) {
streamAllocation.release();
throw new ProtocolException("Too many follow-up requests: " + followUpCount);
}

//不是很清楚,看followUpRequest方法好像在超时的时候会有这个情况
if (followUp.body() instanceof UnrepeatableRequestBody) {
streamAllocation.release();
throw new HttpRetryException("Cannot retry streamed HTTP body", response.code());
}

//如果请求可以重用此链接sameConnection方法返回true,如果不能重用就获取一个新链接
if (!sameConnection(response, followUp.url())) {
streamAllocation.release();
streamAllocation = new StreamAllocation(client.connectionPool(),
createAddress(followUp.url()), call, eventListener, callStackTrace);
this.streamAllocation = streamAllocation;
} else if (streamAllocation.codec() != null) {
//如果是可以重此链接,但是HttpCodec(编码HTTP请求并解码HTTP响应)并没有重置则抛出异常
throw new IllegalStateException("Closing the body of " + response
+ " didn't close its backing stream. Bad interceptor?");
}

request = followUp;
priorResponse = response;
}
}

BridgeInterceptor

从应用程序代码到网络代码的桥梁。首先,它从用户请求构建网络请求。然后它继续调用网络。最后,它从网络响应构建用户响应。其实就是对Request和Response的Header进行操作,主要是为Request添加请求头,为Response添加响应头如图:

功能很简单,就不贴源码了

CacheInterceptor

cache 缓存,CacheInterceptor就是用来处理缓存的拦截器.简单来说一次请求中,如果有缓存的Response则直接返回,如果没有,就在拦截器链返回Response后缓存起来.
在解析CacheInterceptor之前,我们要了解HTTP缓存机制(HTTP缓存机制-客户端缓存).HTTP缓存机制图片:

缓存响应头:

Cache-control:在响应http请求时告诉浏览器在过期时间前浏览器可以直接从浏览器缓存取数据,而无需再次请求。 HTTP-Header中的Cache-Control字段:可以是public、private、no-cache、no- store、no-transform、must-revalidate、proxy-revalidate、max-age

各个消息中的指令含义如下:

  • public指示响应可被任何缓存区缓存。
  • private指示对于单个用户的整个或部分响应消息,不能为共享缓存处理.这允许服务器仅仅描述当前用户的部分消息,次响应消息对其他用户的请求无效
  • no-cache指示请求或响应消息不能缓存
  • no-store用于防止重要的信息被无意发布.在请求消息中发送将使得请求和响应消息都不使用缓存.
  • max-age指示可以客户机接收生存期不大于指定时间(以秒为单位)的响应
  • min-fresh指示客户机可以接收响应时间小于当前时间加上指定时间的响应.
  • max-stale指示客户机可以接收超出超时期间的响应消息.如果指定max-stale消息的值,那么客户机可以接收超出超时期指定的值之内的响应消息

Date: 服务器告诉客户端,该资源的发送时间

Expires: 表示过期时间(该字段是1.0的东西,当cache-control和该字段同时存在的条件下,cache-control的优先级更高);

Last-Modified:服务器告诉客户端,资源的最后修改时间;

E-Tag:这个图没给出,意思是,当前资源在服务器的唯一标识,可用于判断资源的内容是否被修改了.

除以上响应头字段以外,还需了解两个相关的Request请求头:If-Modified-since、If-none-Match。这两个字段是和Last-Modified、E-Tag配合使用的。大致流程如下:

服务器在请求时,会在200 OK中返回该资源的Last-Modified和ETag头(服务器支持缓存的情况下才有),客户端将该资源保存在Catch中,并记录这两个属性.当客户端发送相同请求时,根据Date+Cache-control来判断是否缓存过期,如果过期,会在请求中携带If-Modified-Since和If-None-Match两个头。两个头的值分别是响应中Last-Modified和ETag头的值。服务器通过这两个头判断本地资源未发生变化,客户端不需要重新下载,返回304响应。

与ConnectInterceptor相关的几个类:


CacheStrategy:是一个缓存策略类,给定一个请求和缓存的响应,该数据将决定是否使用网络、缓存,或者两者都使用。

Cache是封装了实际的缓存操作;基于DiskLruCache

代码如下:

1
2
3
4
5
6
7
8
9
10
11
12
13
14
15
16
17
18
19
20
21
22
23
24
25
26
27
28
29
30
31
32
33
34
35
36
37
38
39
40
41
42
43
44
45
46
47
48
49
50
51
52
53
54
55
56
57
58
59
60
61
62
63
64
65
66
67
68
69
70
71
72
73
74
75
76
77
78
79
80
81
82
83
84
85
86
87
88
89
90
91
92
93
94
95
96
97
98
@Override public Response intercept(Chain chain) throws IOException {
Response cacheCandidate = cache != null
? cache.get(chain.request()) //以request的url而来key,获取缓存
: null;

long now = System.currentTimeMillis();
//缓存策略类,该类决定了是使用缓存还是进行网络请求
CacheStrategy strategy = new CacheStrategy.Factory(now, chain.request(), cacheCandidate).get();
//如果为null就代表不用进行网络请求
Request networkRequest = strategy.networkRequest;
//如果为null,则代表不使用缓存
Response cacheResponse = strategy.cacheResponse;

//根据缓存策略,更新统计指标:请求次数、使用网络请求次数、使用缓存次数
if (cache != null) {
cache.trackResponse(strategy);
}
//缓存不适用。关闭它。
if (cacheCandidate != null && cacheResponse == null) {
closeQuietly(cacheCandidate.body());
}

// 如果我们被禁止使用网络而又没有缓存,那么就失败。返回504c错误
if (networkRequest == null && cacheResponse == null) {
return new Response.Builder()
.request(chain.request())
.protocol(Protocol.HTTP_1_1)
.code(504)
.message("Unsatisfiable Request (only-if-cached)")
.body(Util.EMPTY_RESPONSE)
.sentRequestAtMillis(-1L)
.receivedResponseAtMillis(System.currentTimeMillis())
.build();
}

//缓存可用,直接返回缓存,请求结束
if (networkRequest == null) {
return cacheResponse.newBuilder()
.cacheResponse(stripBody(cacheResponse))
.build();
}

Response networkResponse = null;
try {
//继续链式调用,去请求网络
networkResponse = chain.proceed(networkRequest);
} finally {
// If we're crashing on I/O or otherwise, don't leak the cache body.
if (networkResponse == null && cacheCandidate != null) {
closeQuietly(cacheCandidate.body());
}
}

//HTTP_NOT_MODIFIED缓存有效,合并网络请求和缓存
if (cacheResponse != null) {
if (networkResponse.code() == HTTP_NOT_MODIFIED) {
Response response = cacheResponse.newBuilder()
.headers(combine(cacheResponse.headers(), networkResponse.headers()))
.sentRequestAtMillis(networkResponse.sentRequestAtMillis())
.receivedResponseAtMillis(networkResponse.receivedResponseAtMillis())
.cacheResponse(stripBody(cacheResponse))
.networkResponse(stripBody(networkResponse))
.build();
networkResponse.body().close();

// 在合并头部之后更新缓存,但是在剥离内容编码头部之前(由initContentStream()执行)。
cache.trackConditionalCacheHit();
cache.update(cacheResponse, response); //具体更新缓存
return response;
} else {
closeQuietly(cacheResponse.body());
}
}

Response response = networkResponse.newBuilder()
.cacheResponse(stripBody(cacheResponse))
.networkResponse(stripBody(networkResponse))
.build();

//将新的response写入缓存
if (cache != null) {
if (HttpHeaders.hasBody(response) && CacheStrategy.isCacheable(response, networkRequest)) {
// Offer this request to the cache.
CacheRequest cacheRequest = cache.put(response);
return cacheWritingResponse(cacheRequest, response);
}

if (HttpMethod.invalidatesCache(networkRequest.method())) {
try {
cache.remove(networkRequest);
} catch (IOException ignored) {
// The cache cannot be written.
}
}
}

return response;
}

CacheStrategy

CacheStrategy在CacheInterceptor中起到了很关键的作用。该类决定了是网络请求还是使用缓存。该类最关键的代码是getCandidate()方法:

1
2
3
4
5
6
7
8
9
10
11
12
13
14
15
16
17
18
19
20
21
22
23
24
25
26
27
28
29
30
31
32
33
34
35
36
37
38
39
40
41
42
43
44
45
46
47
48
49
50
51
52
53
54
55
56
57
58
59
60
61
62
63
64
65
66
67
68
69
70
71
72
73
74
75
76
77
78
79
80
81
82
83
84
85
86
87
88
89
90
91
private CacheStrategy getCandidate() {
// 没有缓存使用,网络请求
if (cacheResponse == null) {
return new CacheStrategy(request, null);
}

// 如果是HTTPS请求,并且缓存并没有握手,则网络请求
if (request.isHttps() && cacheResponse.handshake() == null) {
return new CacheStrategy(request, null);
}

//如果这个响应不应该被存储,它不应该被用作响应源。只要持久性存储表现良好且规则不变,此检查就应该是冗余的。
//不可缓存,直接网络请求
if (!isCacheable(cacheResponse, request)) {
return new CacheStrategy(request, null);
}

CacheControl requestCaching = request.cacheControl();
//如果请求头包含no-cache或者包含If-Modified-Since或If-None-Match则网络请求
//请求头包含If-Modified-Since或者If-None-Match意味着本地缓存过期,需要服务器验证
if (requestCaching.noCache() || hasConditions(request)) {
return new CacheStrategy(request, null);
}

CacheControl responseCaching = cacheResponse.cacheControl();
if (responseCaching.immutable()) {//强制使用缓存
return new CacheStrategy(null, cacheResponse);
}

long ageMillis = cacheResponseAge();
long freshMillis = computeFreshnessLifetime();

if (requestCaching.maxAgeSeconds() != -1) {
freshMillis = Math.min(freshMillis, SECONDS.toMillis(requestCaching.maxAgeSeconds()));
}

long minFreshMillis = 0;
if (requestCaching.minFreshSeconds() != -1) {
minFreshMillis = SECONDS.toMillis(requestCaching.minFreshSeconds());
}

long maxStaleMillis = 0;
if (!responseCaching.mustRevalidate() && requestCaching.maxStaleSeconds() != -1) {
maxStaleMillis = SECONDS.toMillis(requestCaching.maxStaleSeconds());
}

//可缓存,并且ageMillis + minFreshMillis < freshMillis + maxStaleMillis
// (意味着虽过期,但可用,只是会在响应头添加warning)
if (!responseCaching.noCache() && ageMillis + minFreshMillis < freshMillis + maxStaleMillis) {
Response.Builder builder = cacheResponse.newBuilder();
if (ageMillis + minFreshMillis >= freshMillis) {
builder.addHeader("Warning", "110 HttpURLConnection \"Response is stale\"");
}
long oneDayMillis = 24 * 60 * 60 * 1000L;
if (ageMillis > oneDayMillis && isFreshnessLifetimeHeuristic()) {
builder.addHeader("Warning", "113 HttpURLConnection \"Heuristic expiration\"");
}
return new CacheStrategy(null, builder.build());
}

//流程走到这,说明缓存已经过期了
//添加请求头:If-Modified-Since或者If-None-Match
//etag与If-None-Match配合使用
//lastModified与If-Modified-Since配合使用
//前者和后者的值是相同的
//区别在于前者是响应头,后者是请求头。
//后者用于服务器进行资源比对,看看是资源是否改变了。
// 如果没有,则本地的资源虽过期还是可以用的
String conditionName;
String conditionValue;
if (etag != null) {
conditionName = "If-None-Match";
conditionValue = etag;
} else if (lastModified != null) {
conditionName = "If-Modified-Since";
conditionValue = lastModifiedString;
} else if (servedDate != null) {
conditionName = "If-Modified-Since";
conditionValue = servedDateString;
} else {
return new CacheStrategy(request, null); // No condition! Make a regular request.
}

Headers.Builder conditionalRequestHeaders = request.headers().newBuilder();
Internal.instance.addLenient(conditionalRequestHeaders, conditionName, conditionValue);

Request conditionalRequest = request.newBuilder()
.headers(conditionalRequestHeaders.build())
.build();
return new CacheStrategy(conditionalRequest, cacheResponse);
}

ConnectInterceptor

ConnectInterceptor是一个关于获取连接的拦截器.用于打开到目标服务器的连接并继续到下一个拦截器。ConnectInterceptor的intercept方法代码很简单,实际上大部分功能都被封装到其他类中.其中重要的几个类如下:


StreamAllocation:直译是流分配,用于协调链接,流,请求三者之间的关系.

RouteSelector:选择连接到源服务器的路由。每个连接都需要选择代理服务器、IP地址和TLS模式。连接也可以回收。

RouteDatabase: 创建到目标地址的新连接时要避免的失败路由的黑名单。这是为了让OkHttp能够从错误中吸取教训:如果尝试连接到特定的IP地址或代理服务器的失败,那么将记住失败,首选替代路由。

RealConnecton: Connect子类,主要实现连接的建立等工作

ConnectionPool: 连接池,用于实现连接复用.

HttpCodec: 编码HTTP请求并解码HTTP响应。针对不同的版本,OkHttp为我们提供了Http1Codec(Http1.x)和Http2Codec(Http2).

1
2
3
4
5
6
7
8
9
10
11
12
@Override public Response intercept(Chain chain) throws IOException {
RealInterceptorChain realChain = (RealInterceptorChain) chain;
Request request = realChain.request();
StreamAllocation streamAllocation = realChain.streamAllocation();

// 是否要对一次请求对应的connection做广泛的健康检查
boolean doExtensiveHealthChecks = !request.method().equals("GET");
HttpCodec httpCodec = streamAllocation.newStream(client, chain, doExtensiveHealthChecks);
RealConnection connection = streamAllocation.connection();

return realChain.proceed(request, streamAllocation, httpCodec, connection);
}

核心代码就这两行

1
2
HttpCodec httpCodec = streamAllocation.newStream(client, chain, doExtensiveHealthChecks);
RealConnection connection = streamAllocation.connection();

可见主要的工作都是在StreamAllocation中完成的.StreamAllocation的newStream方法和connection方法做了什么呢?

newStream方法

1
2
3
4
5
6
7
8
9
10
11
12
13
14
15
16
17
18
19
20
21
public HttpCodec newStream(
OkHttpClient client, Interceptor.Chain chain, boolean doExtensiveHealthChecks) {
int connectTimeout = chain.connectTimeoutMillis();
int readTimeout = chain.readTimeoutMillis();
int writeTimeout = chain.writeTimeoutMillis();
int pingIntervalMillis = client.pingIntervalMillis();
boolean connectionRetryEnabled = client.retryOnConnectionFailure();

try {
RealConnection resultConnection = findHealthyConnection(connectTimeout, readTimeout,
writeTimeout, pingIntervalMillis, connectionRetryEnabled, doExtensiveHealthChecks);
HttpCodec resultCodec = resultConnection.newCodec(client, chain, this);

synchronized (connectionPool) {
codec = resultCodec;
return resultCodec;
}
} catch (IOException e) {
throw new RouteException(e);
}
}

可以看到在newStream方法中关键的方法是findHealthyConnection,此方法是找到一个可用的链接,如果不可用则会重复直到找到.

findHealthyConnection方法:

1
2
3
4
5
6
7
8
9
10
11
12
13
14
15
16
17
18
19
20
21
22
23
private RealConnection findHealthyConnection(int connectTimeout, int readTimeout,
int writeTimeout, int pingIntervalMillis, boolean connectionRetryEnabled,
boolean doExtensiveHealthChecks) throws IOException {
while (true) {
RealConnection candidate = findConnection(connectTimeout, readTimeout, writeTimeout,
pingIntervalMillis, connectionRetryEnabled);

// 如果这是一个全新的连接,我们可以跳过广泛的健康检查。
synchronized (connectionPool) {
if (candidate.successCount == 0) {
return candidate;
}
}

// 判断链接是否可用
if (!candidate.isHealthy(doExtensiveHealthChecks)) {
//连接不好使的话,移除连接池
noNewStreams();
continue;
}
return candidate;
}
}

我们再看findConnection方法

1
2
3
4
5
6
7
8
9
10
11
12
13
14
15
16
17
18
19
20
21
22
23
24
25
26
27
28
29
30
31
32
33
34
35
36
37
38
39
40
41
42
43
44
45
46
47
48
49
50
51
52
53
54
55
56
57
58
59
60
61
62
63
64
65
66
67
68
69
70
71
72
73
74
75
76
77
78
79
80
81
82
83
84
85
86
87
88
89
90
91
92
93
94
95
96
97
98
99
100
101
102
103
104
105
106
107
108
109
110
111
112
113
114
115
116
117
118
119
120
121
122
private RealConnection findConnection(int connectTimeout, int readTimeout, int writeTimeout,
int pingIntervalMillis, boolean connectionRetryEnabled) throws IOException {
boolean foundPooledConnection = false;
RealConnection result = null;
Route selectedRoute = null;
Connection releasedConnection;
Socket toClose;
synchronized (connectionPool) {
if (released) throw new IllegalStateException("released");
if (codec != null) throw new IllegalStateException("codec != null");
if (canceled) throw new IOException("Canceled");

// 尝试使用已分配的连接。这里我们需要小心,因为我们已经分配的连接可能被限制在创建新的流。
releasedConnection = this.connection;
//如果连接不能创建Stream,则释放资源,返回待关闭的close Socket
toClose = releaseIfNoNewStreams();
//经过releaseIfNoNewStreams,如果connection不为null,则连接是可用的
if (this.connection != null) {
// 获取到一个已经分配好的连接
result = this.connection;
releasedConnection = null; //为null值说明这个链接是有效的
}
if (!reportedAcquired) {
// If the connection was never reported acquired, don't report it as released!
releasedConnection = null;
}

if (result == null) {
// 尝试从链接池中获取连接。此时route 为null
Internal.instance.get(connectionPool, address, this, null);
if (connection != null) {
foundPooledConnection = true;
result = connection;
} else {
selectedRoute = route;
}
}
}
closeQuietly(toClose);

if (releasedConnection != null) {
eventListener.connectionReleased(call, releasedConnection);
}
if (foundPooledConnection) {
eventListener.connectionAcquired(call, result);
}
if (result != null) {
// 如果我们发现了一个已经分配的连接或池连接,则返回。
return result;
}

// 在route为null的情况下没有找到链接,则构建路由信息从新寻找.这是一个阻塞的过程
boolean newRouteSelection = false;
if (selectedRoute == null && (routeSelection == null || !routeSelection.hasNext())) {
newRouteSelection = true;
routeSelection = routeSelector.next();
}

synchronized (connectionPool) {
if (canceled) throw new IOException("Canceled");

if (newRouteSelection) {
// 现在我们有了一组IP地址,再尝试从池中获取连接.
List<Route> routes = routeSelection.getAll();
for (int i = 0, size = routes.size(); i < size; i++) {
Route route = routes.get(i);
Internal.instance.get(connectionPool, address, this, route);
if (connection != null) {
foundPooledConnection = true;
result = connection;
this.route = route;
break;
}
}
}

//还是没有找到,则生成新的链接
if (!foundPooledConnection) {
if (selectedRoute == null) {
selectedRoute = routeSelection.next();
}

//创建一个连接并立即分配给这个。这使得异步cancel()可以中断我们将要执行的握手。
route = selectedRoute;
refusedStreamCount = 0;
result = new RealConnection(connectionPool, selectedRoute);
acquire(result, false);
}
}

// 如果从链接池中找到的,说明可以复用,可以直接返回.
if (foundPooledConnection) {
eventListener.connectionAcquired(call, result);
return result;
}

// 进行TCP + TLS握手链接服务器。这是一个阻塞操作。
result.connect(connectTimeout, readTimeout, writeTimeout, pingIntervalMillis,
connectionRetryEnabled, call, eventListener);
//将路由信息添加到routeDatabase中。
routeDatabase().connected(result.route());

Socket socket = null;
synchronized (connectionPool) {
reportedAcquired = true;

// 将新生成的链接放入链接池
Internal.instance.put(connectionPool, result);

//如果是一个http2连接,由于http2连接应具有多路复用特性,
// 因此,我们需要确保http2连接的多路复用特性
if (result.isMultiplexed()) {
//deduplicate:确保http2连接的多路复用特性,重复的连接将被剔除
socket = Internal.instance.deduplicate(connectionPool, address, this);
result = connection;
}
}
closeQuietly(socket);

eventListener.connectionAcquired(call, result);
return result;
}

ConnectionPool

在Connectinterceptor中,ConnectionPool起到关键作用.目前默认保存5个空闲链接,在5分钟不活动后将其清除。

线程池:用于支持连接池的cleanup任务,清除idle线程;

队列:存放待复用的连接;

路由记录表: 创建到目标地址的新连接时要避免的失败路由的黑名单。这是为了让OkHttp能够从错误中吸取教训:如果尝试连接到特定的IP地址或代理服务器的失败,那么将记住失败,首选替代路由。

对于连接池操作,关键就是 存,取,删除

存:

1
2
3
4
5
6
7
8
void put(RealConnection connection) {
assert (Thread.holdsLock(this));
if (!cleanupRunning) {
cleanupRunning = true;
executor.execute(cleanupRunnable);
}
connections.add(connection);
}

在add(connection);之前,先进行了清除工作,cleanupRunnable中主要方法就是cleanup(System.nanoTime());

1
2
3
4
5
6
7
8
9
10
11
12
13
14
15
16
17
18
19
20
21
22
23
24
25
26
27
28
29
30
31
32
33
34
35
36
37
38
39
40
41
42
43
44
45
46
47
48
49
50
51
52
53
long cleanup(long now) {
int inUseConnectionCount = 0;
int idleConnectionCount = 0;
RealConnection longestIdleConnection = null;
long longestIdleDurationNs = Long.MIN_VALUE;

// Find either a connection to evict, or the time that the next eviction is due.
synchronized (this) {
for (Iterator<RealConnection> i = connections.iterator(); i.hasNext(); ) {
RealConnection connection = i.next();

// 如果连接正在使用,请继续搜索。
if (pruneAndGetAllocationCount(connection, now) > 0) {
inUseConnectionCount++;//线程池中处于使用状态的连接数
continue;
}

idleConnectionCount++;//处于空闲状态的连接数

// If the connection is ready to be evicted, we're done.
long idleDurationNs = now - connection.idleAtNanos;
//寻找空闲最久的那个连接
if (idleDurationNs > longestIdleDurationNs) {
longestIdleDurationNs = idleDurationNs;
longestIdleConnection = connection;
}
}

//空闲最久的那个连接
//如果空闲时间大于keepAliveDurationNs(默认5分钟)
//或者空闲的连接总数大于maxIdleConnections(默认5个)
//--->执行移除操作
if (longestIdleDurationNs >= this.keepAliveDurationNs
|| idleConnectionCount > this.maxIdleConnections) {
// We've found a connection to evict. Remove it from the list, then close it below (outside
// of the synchronized block).
connections.remove(longestIdleConnection);
} else if (idleConnectionCount > 0) {
// A connection will be ready to evict soon.
return keepAliveDurationNs - longestIdleDurationNs;
} else if (inUseConnectionCount > 0) {
// All connections are in use. It'll be at least the keep alive duration 'til we run again.
return keepAliveDurationNs;
} else {
// No connections, idle or in use.
cleanupRunning = false;
return -1;
}
}
closeQuietly(longestIdleConnection.socket());
// Cleanup again immediately.
return 0;
}

取:

1
2
3
4
5
6
7
8
9
10
11
12
13
@Nullable RealConnection get(Address address, StreamAllocation streamAllocation, Route route) {
assert (Thread.holdsLock(this));
for (RealConnection connection : connections) {
//isEligible判断一个连接(address+route对应的)
// 是否还能携带一个StreamAllocation。如果有,说明这个连接可用
if (connection.isEligible(address, route)) {
//将StreamAllocation添加到connection.allocations中
streamAllocation.acquire(connection, true);
return connection;
}
}
return null;
}

首先,判断address对应的Connection是否还能承载一个新的StreamAllocation,如果可以得话,我们就将这个streamAllocation添加到connection.allocations中。最后返回这个Connection。我们再看isEligible方法

1
2
3
4
5
6
7
8
9
10
11
12
13
14
15
16
17
18
19
20
21
22
23
24
25
26
27
28
29
30
31
32
33
34
35
36
37
38
39
40
public boolean isEligible(Address address, @Nullable Route route) {
// 如果这个连接不接受新的流 return false
if (allocations.size() >= allocationLimit || noNewStreams) return false;

// 如果地址的非主机字段不相等
if (!Internal.instance.equalsNonHost(this.route.address(), address)) return false;

// 如果请求地址相等
if (address.url().host().equals(this.route().address().url().host())) {
return true; // This connection is a perfect match.
}

//此时,我们没有主机名匹配。但是,如果我们的连接合并需求得到满足,我们仍然可以继续执行请求。
//参见:
//https://hpbn.co/optimizing-application-delivery/eliminate-domain-sharding
//https://daniel.haxx.se/blog/2016/08/18/http2-connection-coalescing/

// 1. 这个连接必须是HTTP/2。但是http2Connection为空
if (http2Connection == null) return false;

// 2. 路由必须共享一个IP地址。这需要我们为两台主机都有一个DNS地址,这只在路由规划之后才会发生。
// 我们不能合并使用代理的连接,因为代理没有告诉我们源服务器的IP地址。
if (route == null) return false;
if (route.proxy().type() != Proxy.Type.DIRECT) return false;
if (this.route.proxy().type() != Proxy.Type.DIRECT) return false;
if (!this.route.socketAddress().equals(route.socketAddress())) return false;

// 3. 此连接的服务器证书必须覆盖新主机。
if (route.address().hostnameVerifier() != OkHostnameVerifier.INSTANCE) return false;
if (!supportsUrl(address.url())) return false;

// 4.证书固定必须与主机匹配
try {
address.certificatePinner().check(address.url().host(), handshake().peerCertificates());
} catch (SSLPeerUnverifiedException e) {
return false;
}

return true; // The caller's address can be carried by this connection.
}

移除:

void evictAll() {
1
2
3
4
5
6
7
8
9
10
11
12
13
14
15
16
  List<RealConnection> evictedConnections = new ArrayList<>();
synchronized (this) {
for (Iterator<RealConnection> i = connections.iterator(); i.hasNext(); ) {
RealConnection connection = i.next();
if (connection.allocations.isEmpty()) {
connection.noNewStreams = true;
evictedConnections.add(connection);
i.remove();
}
}
}

for (RealConnection connection : evictedConnections) {
closeQuietly(connection.socket());
}
}

CallServerInterceptor

经过ConnectInterceptor后,此时链接connection和httpCodec,都已经准备好,现在就需要通过CallServerInterceptor真正的去请求服务器获取Response.

1
2
3
4
5
6
7
8
9
10
11
12
13
14
15
16
17
18
19
20
21
22
23
24
25
26
27
28
29
30
31
32
33
34
35
36
37
38
39
40
41
42
43
44
45
46
47
48
49
50
51
52
53
54
55
56
57
58
59
60
61
62
63
64
65
66
67
68
69
70
71
72
73
74
75
76
77
78
79
80
81
82
83
84
85
86
87
88
89
90
91
92
93
94
95
96
97
98
99
100
101
@Override public Response intercept(Chain chain) throws IOException {
RealInterceptorChain realChain = (RealInterceptorChain) chain;
HttpCodec httpCodec = realChain.httpStream();
StreamAllocation streamAllocation = realChain.streamAllocation();
RealConnection connection = (RealConnection) realChain.connection();
Request request = realChain.request();

long sentRequestMillis = System.currentTimeMillis();

realChain.eventListener().requestHeadersStart(realChain.call());
httpCodec.writeRequestHeaders(request);
realChain.eventListener().requestHeadersEnd(realChain.call(), request);

Response.Builder responseBuilder = null;
if (HttpMethod.permitsRequestBody(request.method()) && request.body() != null) {
//如果请求上有一个“Expect: 100- Continue”头,那么在发送请求主体之前,
// 等待一个“HTTP/1.1 100 Continue”响应。如果我们没有得到,那么返回我们得到的内容(例如4xx响应),
// 而不发送请求主体。
//Expect: 100- Continue”头表示在客户端发送 Request Message 之前,HTTP/1.1 协议允许客
// 户端先判定服务器是否愿意接受客户端发来的消息主体(基于 Request Headers)。即,
// Client 和 Server 在 Post (较大)数据之前,允许双方“握手”,如果匹配上了,Client 才开始发送(较大)数据。
// 这么做的原因是,如果客户端直接发送请求数据,但是服务器又将该请求拒绝的话,这种行为将带来很大的资源开销。
if ("100-continue".equalsIgnoreCase(request.header("Expect"))) {
httpCodec.flushRequest();
realChain.eventListener().responseHeadersStart(realChain.call());
responseBuilder = httpCodec.readResponseHeaders(true);
}

if (responseBuilder == null) {
// 如果“Expect: 100-continue”期望得到满足,则编写请求主体。
realChain.eventListener().requestBodyStart(realChain.call());
long contentLength = request.body().contentLength();
CountingSink requestBodyOut =
new CountingSink(httpCodec.createRequestBody(request, contentLength));
BufferedSink bufferedRequestBody = Okio.buffer(requestBodyOut);

request.body().writeTo(bufferedRequestBody);
bufferedRequestBody.close();
realChain.eventListener()
.requestBodyEnd(realChain.call(), requestBodyOut.successfulCount);
} else if (!connection.isMultiplexed()) {
// 如果不满足“Expect: 100-continue”期望,则防止HTTP/1连接被重用。
// 否则,我们仍有义务传输请求主体,使连接保持一致状态。
streamAllocation.noNewStreams();
}
}

httpCodec.finishRequest();

if (responseBuilder == null) {
realChain.eventListener().responseHeadersStart(realChain.call());
responseBuilder = httpCodec.readResponseHeaders(false);
}

Response response = responseBuilder
.request(request)
.handshake(streamAllocation.connection().handshake())
.sentRequestAtMillis(sentRequestMillis)
.receivedResponseAtMillis(System.currentTimeMillis())
.build();

int code = response.code();
if (code == 100) {
// 服务器发送了一个100继续,即使我们没有请求。再次尝试阅读实际的响应
responseBuilder = httpCodec.readResponseHeaders(false);

response = responseBuilder
.request(request)
.handshake(streamAllocation.connection().handshake())
.sentRequestAtMillis(sentRequestMillis)
.receivedResponseAtMillis(System.currentTimeMillis())
.build();

code = response.code();
}

realChain.eventListener()
.responseHeadersEnd(realChain.call(), response);

if (forWebSocket && code == 101) {
// Connection is upgrading, but we need to ensure interceptors see a non-null response body.
response = response.newBuilder()
.body(Util.EMPTY_RESPONSE)
.build();
} else {
response = response.newBuilder()
.body(httpCodec.openResponseBody(response))
.build();
}

if ("close".equalsIgnoreCase(response.request().header("Connection"))
|| "close".equalsIgnoreCase(response.header("Connection"))) {
streamAllocation.noNewStreams();
}

if ((code == 204 || code == 205) && response.body().contentLength() > 0) {
throw new ProtocolException(
"HTTP " + code + " had non-zero Content-Length: " + response.body().contentLength());
}
return response;
}

可以看到实际的IO操作都是由okio来进行的,这里不做过多的分析

总结

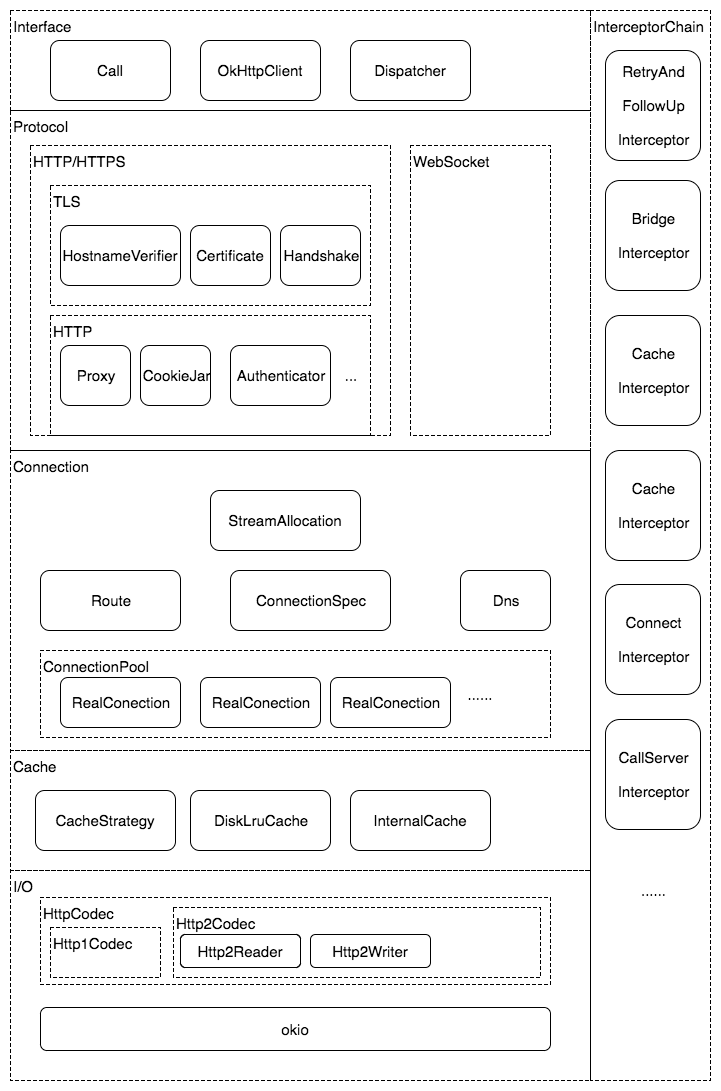
okhttp是一个Http+Htttp2客户端,适用于Android + Java 应用。其整体的架构如下:
(此图来源于https://yq.aliyun.com/articles/78105?spm=5176.100239.blogcont78104.10.FlPFWr,感谢)